Showing posts with label ballpark recipes. Show all posts

4.20.2015

Q - Quinoa!

I discovered quinoa this year when I was told I shouldn't eat wheat, oats, pasta, dairy, chocolate, or anything else that I've been eating for 40 years.  Quinoa is good for me, as are walnuts and cinnamon.

So I combined them into a wonderful breakfast cereal (I've had to dump processed, boxed cereals as well.)

Simmer quinoa according to the directions on the package (typically 1 C. to 2 C. ratio of quinoa to liquid.)  I use almond milk for the liquid because it's full of protein.

While the quinoa is simmering (covered), sprinkle in 1 t. of cinnamon, or however much you like. You can also add nutmeg if you'd like.  When all the liquid is absorbed, the quinoa is done - this usually takes about 15 min.

Scoop the quinoa into a bowl and drizzle in a bit of real maple syrup, a tab of butter, and some chopped walnuts, or sunflower seeds (or whatever nut you like.)  Add berries for added deliciousness.


Scarf it up while it's warm.  This is my new favorite breakfast.

5.07.2014

BALLPARK BISCOTTI

This blog site is no longer operational. Currently, this post (Ballpark Biscotti) is only available at my NEW SITE HERE.  Re-pin this post with its new URL, so you don't lose it! 

5.02.2014

Puffy Biscuit Rolls

Recently, about three times a week, I've been making a really light biscuit that's more like a bread roll.  These biscuit rolls come together so quickly, I could probably make them every day.  Then, I'd look like a puffy biscuit roll.   So, I'm going to control myself.

Here's the recipe, if you want some lovely biscuit rolls in your life. 


Puffy Biscuit Rolls

425 degree oven - baking time: 12-14 min.


4 C. Bisquick
1 sour cream
1 C. 7-Up, or Seltzer water (I use this because I don't want the extra sugar in soda.)
 1/2 stick melted butter

Stir together Bisquick, sour cream and 7-Up. Sprinkle some Bisquick onto the counter.  Plop dough onto the counter and fold it over and over, incorporating the Bisquick just until the dough is not sticky, but still moist.  Don't knead, or biscuits will be tough.  Pat the dough flat with your hands, about 1/2 inch thick.


Flattened dough - it's hard to see because the counter is white.  :-)

Dump melted butter in pan. Cut circles or squares of dough and place rolls in buttered pan.  You should get 8-10. 


Bake for 12-14 minutes, depending on the size of your biscuit rolls.  Remove them from the oven when they are light golden.  Immediately brush tops with butter.


These are soft and moist and great for sandwiches.  They're best eaten right away, or at least the same day.  If they're not going to be devoured pretty quickly, store them in a zippered bag.

So delish.  Biscuit-like, but roll-like.  Light and fluffy.  Perfect for a weekend breakfast.  Or a late-night snack.

Paula Deen would be jealous.


4.18.2014

P is for PIE!

I love pie more than cake, or ice cream, or brownies, or even a chocolate bar.  Pie is my favorite dessert.

Recently, however, I made a chicken pie that my husband and I ate in two sittings.  He ate a quarter of this pie the first night.


I combined several recipes for chicken pot pie and made a simple version.  I'm all about simple.

It starts with a store-bought pie crust (like the Pillsbury rolled crusts) and cooked/shredded chicken (I used some leftover rotisserie chicken from Walmart, which was delish.)  Rolled pie crusts come two in a package.  Perfect.   You can make your own pie crust if you prefer, but I never have luck with that.  If you can make a good pie crust, you get an A+ from the Ballpark.

Roll out one crust in a pie pan, like so...


Don't worry about uneven edges.  You're going to scrunch it with the top crust anyway.

In a large sauce pan or dutch oven, saute:

2 T. olive oil
4 large carrots, peeled and sliced
1 large onion, peeled and sliced
2 stalks celery sliced (include some leaves, if you love the celery flavor)

When veggies are just soft (remember they'll bake some more in the oven), sprinkle over the veggies 4 heaping T. flour.  Stir the veggies until the flour is absorbed.  Slowly stir in 1 C. milk (I use skim) and 1 C. chicken or vegetable broth (I use the stuff in the box, but you can certainly use homemade.)  Stir gently until mixture bubbles and thickens.

Stir in some frozen peas, as many as you like.  I added a couple handfuls.  Stir in 1 t. dried thyme and 1 t. dried basil.  And salt and pepper to taste. 

Stir and simmer a little more until mixture is smooth and looks like this...


Dump in your chicken, as much as you like.  I used about 1 and 1/2 cups.  Stir it all together.  


The more solids you have, the thicker the broth will be; fewer veggies and chicken, the thinner the broth will be.

Spoon this creamy filling into your pie shell.


Cover with the top crust.  On the edges, fold the top dough over the lower dough.  Press them together as you go.  You want to seal in the pie juice.

Gently go around the pie pan again, pressing the edges against the pan, giving an extra seal and creating a pretty trim. 


Make a few slits in the top crust to allow steam to escape during baking.

Bake according to the pie crust directions on the box.  Keep in mind the innards of the pie are already cooked; you're just baking the crust.  Keep an eye on it and remove it when it's a dark golden.

Let the pie rest at least 15 minutes before slicing.  Otherwise, the juices will run out.  As the pie sits, the juices thicken a bit.


This is even better the next day.  If you have any leftover the next day.

P is for PIE!!!!!


4.15.2014

Many, Many, Many Lunches!

M is for MANY!  As in 30+ packed lunch ideas.

A few years ago, I started packing lunches for my husband and our teacher/daughter who was back home for awhile.  Peanut butter and jelly was OK on occasion, but I wanted to see how many different ideas I could create.  I wanted to use leftovers and produce as much as possible.

Here's what I came up with:  30 + PACKED LUNCHES. 

I guarantee there will be something you'll want to try.   Don't we all get tired of fixing the same thing over and over?

Leftover roast beef, whatever-you-have pasta salad, celery brooms 
with peanut butter/honey, and grapes


Do you pack a lunch?  If so, what are your favorite ideas?


4.02.2014

B is for Peanut Butter Cup Brownies

Day two of the A-Z Challenge!

B is for brownies.  It's my favorite B word. 


Peanut Butter Cup Brownies really take the cake.  I discovered this recipe while flipping through a magazine in a doctor's office.  I simplified it, and I used our own home recipe for the chocolate dough. They are divine.

Simply mix up a batch of brownie dough, from scratch, or from a box.  (Our recipe is here: BALLPARK BROWNIES.)  Pour half the batter into the pan, lay unwrapped peanut butter cups over the batter, and cover the cups with the remaining batter.  Here are the details:  BROWNIES EXTRAORDINAIRE.

Easy peasy.  If you try either of the recipes above, you might never use another brownie recipe again.   These are really wonderful with a spot of tea.  And then, a nap.


2.28.2014

Brownies Extraordinaire

I find the best recipes sitting in doctors' offices.  Here's the most recent treat I stumbled upon in a magazine.


Ballpark Peanut Butter Brownies


Get a load of these delectable treats.  As is often the case, the recipe in the magazine was more complicated than it had to be.  I put the Ballpark spin on it, and now I almost regret I ever saw this idea, because these brownies might just be the death of me.

The awesome, added ingredient is snack-size Reese's peanut butter cups.  About sixteen cups laid right in the brownie dough.  The chocolate melts, but, after cooling, the peanut butter retains its cup-shape.  They are thick and rich, and you really can eat only one.  At a time, anyway.

Here's the process:

Make a batch of Ballpark Brownies dough.  Click HERE for that recipe.  (You might be able to use a store-bought mix, but I can't guarantee they will turn out.  The brownies in the magazine were also made from scratch.)

Scoop half the dough into your well greased pan.  I use our Baker's Secret pan for brownies, but I believe a 9x11 pan will be fine.  A 9x13 pan would spread the dough thin, and there might not be enough to cover the peanut butter cups.

Baker's Secret pan getting ready for the oven

Once you have half the dough in your pan, gently arrange the unwrapped cups (don't forget to remove the paper liner) over the dough, placing as many as you can.  I halved one to fill the gaps.

Cover the cups with the remaining dough.


Pop 'em in the oven and bake according to the brownie recipe directions.

Let these cool before you cut them.  If you don't, the peanut butter will be soft and messy (though tasty.)  After the brownies cooled for about half an hour, I put the pan in the 'fridge until the pan was cool. I cut the brownies with a clean, sharp knife - it's the best way to see the intact peanut butter cups looking back at 'cha.  Not every brownie will have a perfect layer of peanut butter, but enough of them will.


Such a decadent dessert.  Probably best made when you have company, or a crowd, so they quickly disappear.  Then, you won't have leftovers in your house, calling you at midnight to come indulge.  Talk about seduction, my oh my.

March is just hours away!  Sounds like a reason to celebrate with brownies, don't you think?  


6.11.2013

Microwave Cobbed Corn

I just found two typos in my last two posts.  It's embarrassing.  I work darn hard to write brilliantly, and it's disappointing to discover mistakes that have been on exhibit to the world for a week or more.  My daughter usually spots any errors, but she's on a road trip this month, so I'll blame her.   Free labor isn't what it used to be.

I wanted to share a corn-on-the-cob cooking method, which I just learned from a couple in the grocery store.  I saw this idea on Pinterest, so I don't claim it as my own.  However, the directions I saw were limited.  The couple in the grocery store told me exactly how to cook the corn in a microwave, and I've tried it twice now.  I doubt I'll ever use another method again. 

It's very complicated, so pay attention.

1.  Place unshucked ears of corn on a microwave proof plate and cook for four minutes per ear.  For these two ears, the total cooking time was eight minutes.  It's OK that the husks look discolored and icky.  They cook too.

2.  Next, grab a pot holder or a thick wad of paper towels (because the ears are very hot) and cut off the stem end of the ears, about an inch up.

3.  Using the pot holder, squeeze the silk end of the husk, working the corn down and out the open end.


The silk stays in the husk!  It's very exciting.

No silk on the corn.  One tiny strand on the cutting board, from the husk stripping, but the golden corn is silk-free. 

Slather the thing in butter, and there you go.  Steaming hot, tender, string-free corn.

I was joshing about this being complicated.  It's three steps: cook, cut, squeeze.  It's easy as pie.  Although, pie is not really easy; it's tricky.  Microwave corn-on-the-cob is not pie.

It's corn season, and I'm buying it often.  I usually add a final step, which is sawing the kernels off the cob with a sharp knife.  Then, we don't need dental floss after the meal.  

Try this method for cooking fresh corn, and let me know what you think.  (And if you find a typo, let me know that too.)


4.29.2013

YOGURT Squares

A friend of mine bought two quarts of plain Greek yogurt over the summer.  Then, she thought it smelled bad and didn't trust it.   She offered it to me.  I said Greek yogurt usually smells bad; that's how it smells.

I took it off her hands and made these.


I spooned the yogurt into ice cube trays and froze it.  Then, I dumped the cubes into a gallon freezer bag.

When I make smoothies, I pull out 4-5 cubes and blend them up with fruit, soy milk, and juice of any kind.  It's a great way to keep yogurt around long-term and get some extra protein/calcium in a smoothie.  It will work with any type yogurt, doesn't have to be Greek, or smelly.

This post was brought to you by the shape square, the color pink, and the letter Y.   
One more day.....one day more....(Les Miserables is suddenly coming to mind.)


11.29.2012

Talking Turkey (and other treats)

This blog site is no longer operational. Currently, this post will only be available at my NEW SITE HERE. Re-pin "Talking Turkey" with it's new URL, so you don't lost it! 

~     ~     ~     ~     ~     ~     ~

December is here! 

It comes every time this year, but it still surprises me.  I live in Florida, so I'm a shorts/flip-flop girl year round.  I hung clothes out in the sunshine just yesterday.   And scarfed down two fat, juicy navel oranges.  Snow shovels and mittens just aren't on my radar.

We have to manufacture Christmas down here.  A couple of things that help Floridans get in the mood are blinking house lights and blow-up yard displays.  One neighbor has a blow-up Santa holding a shot gun peering from a look-out tower.  A reindeer is cowering behind a bush.   That's how we do it in the South.

I learned a couple of tricks this Thanksgiving.  The first one, thanks to Trisha Yearwood, is how to roast a perfect bird (her method was in the Sunday paper.)  It's so easy - and nontraditional - you won't believe it.   I tweaked a few things, and, I'm telling ya', we are never having dry turkey again.  Here's the recipe; it's very short:

For a 12-pounder, stuff the cleaned bird with an apple, an onion, a stalk of celery, and an orange, all cut in chunks.  Place the bird breast side down in a roasting pan with a lid.  It will lean to one side - that's OK.  Add 2 cups of boiling water to the pan, and put the lid on.  Place the pan in a 500 degree oven for one hour.  After the hour, turn the oven off and go to bed.  Really.  

That's it.  In the morning, the turkey is done, still warm, and delicious.  No watching, or basting.  No turkey hogging the oven when you later need it for the sweet potatoes, stuffing, and whatever else you're baking. 

I cooked a 7-pound turkey breast this year, put the bird in about midnight, did not check it until 8 a.m.  The meat fell off the bone.  It was the most tender turkey we have ever had, fork tender.  No knives needed.


Placing the bird breast side down enables all the juices to drain into the bulk of the meat.  Covering the bird and adding water allows the meat to steam.  If you want the golden-skinned Norman Rockwell bird that you present at your holiday table, you might not care for this method, as the turkey skin stays soft and unbrowned. 

We didn't care.  The moist meat was worth it.  (I always slice the meat off the carcass for the table anyway.  If that's the method you use, you will love this.)  The flavorful water/juice remaining in the pan is the base for your gravy.   This method makes such good sense to me, I don't know why, for generations, women have been roasting turkeys breast side up with no fluid and no cover.  That's a recipe for dry meat. 

I discovered another trick while wondering how to use up leftover mashed potatoes and stuffing.  I came up with this.   


I stirred the potatoes and stuffing together, added some Parmesan cheese, and rolled the mixture into balls that fit nicely into a muffin tin.  I baked them for ten minutes until warmed though, then added a slice of cheese and some leftover spinach dip (Ranch dressing would be great too.) 


Viola!  A fancy, tasty new twist on "stuffed potatoes."   I guess you could throw the green bean casserole in there too.

Here's another thing I threw together.  


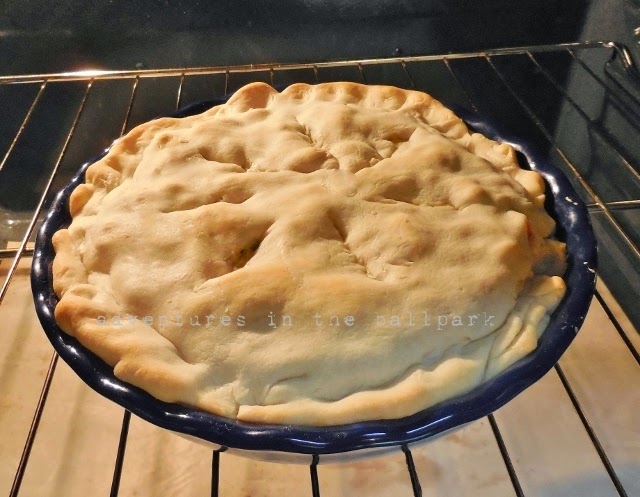
Our daughter makes the best whole wheat bread.  We usually have rolls, but this year, she was out when the dough was ready to shape.  I didn't want to spend time rolling balls, so I hastily made three uneven snakes and braided them together.  The misshapen log looked small and goofy on the cookie sheet, but it puffed up beautifully.   Sometimes I just get lucky. 

My last item is from Pinterest.  I saw these cutie-patooties and had to try them.


Keebler's Fudge Stripe cookies, peanut-butter cups, and frosting (canned or homemade.)  You just assemble them.  The cups are stuck to the cookies with a glob of frosting.  Tint the last of the frosting yellow, and pipe a "buckle" onto the front with a fine tip.   Miles Standish would be proud. 

I wanted to share a few holiday cooking discoveries, because in four weeks, we get to do it all again.   You might want an ugly, but succulent turkey, a stuffed potato muffin, or a bread braid.  The Ballpark aims to please.

Next....


Christmas!!!!


10.16.2012

BAGGING IT (30+ lunches for 30+ Days)

This blog site is no longer operational. Currently, this post will only be available at my NEW SITE HERE.  Re-pin this post with its new URL, so you don't lose it! 

8.31.2012

Ballpark Brownies

This blog site is no longer operational. Currently, this post 
(Ballpark Brownies) is only available at my NEW SITE HERE.  Re-pin this post with its new URL, so you don't lose it! 

8.02.2012

Tortilla Stack

This recipe is more a method than a specific formula.  The first version I saw of this was at Peas and Crayons Blog.  I've altered it to suit our tastes, and every time I make it, it's a bit different.  

You can build this "stack" with many different ingredients and quantities, depending on what you like and what you have on hand.  What I've listed here are the items we most generally use.


Flour or corn tortillas – 3-4

Taco meat, prepared according to seasoning packet.  You can also use shredded chicken, or beef.  (Vegetarian version – substitute cooked brown rice for animal protein.)

Onions, garlic, cabbage, sliced thin and sauteed.  Season with cumin to taste.

Can of refried beans, mixed with jar salsa until desired thinness.  

½ can black beans, drained.

½ can corn, drained.

Grated cheese

Shredded lettuce, diced red pepper, chopped tomatoes, and ½ can black olives, drained and chopped.  Sour cream, diced avocado or guacamole (if desired.)

DIRECTIONS:
Spray baking pan with Pam.  Lay one tortilla on pan.  Spread on about 1/3 of all these ingredients:  refried beans, black beans, the meat/rice, the onion mixture, the corn, and the cheese.  

Lay another tortilla on top.  Repeat the layering sequence until all of these ingredients are used.  (Reserve some cheese for top.)

On last (top) tortilla, spread some salsa to keep top layer moist. Top with cheese.  Bake in 325 degree oven until the stack is warmed through and the cheese is melted, 20-25 minutes.  Remove from oven and top with lettuce, red pepper, tomatoes, and olives.  

Dollop with sour cream/avocado/guacamole, if desired.  


6.08.2012

Tahini-free Hummus

This blog site is no longer operational. Currently, this post (Tahini-free Hummus) is only available at my NEW SITE HERE.  Re-pin this post with its new URL, so you don't lose it! 

2.03.2012

Valentine Number 3 (Squirrel Nut Mix)

This blog site is no longer operational. Currently, this post is only available at my NEW SITE HERE.  Re-pin this post with its new URL, so you don't lose it! 

1.19.2012

Butternut Flatbread (or Squash Pizza)

This blog site is no longer operational. Currently, this post is only available at my NEW SITE HERE.  Re-pin this post with its new URL, so you don't lose it! 

11.01.2011

PUFF DADDY

Halloween is a great time to play with sticky, gooey, scary treats.  Last year, I made severed finger cookies.


Knobby-digit sugar cookies with blood-red, sliced-almond fingernails.  They were a hit with the senior citizens at Southland. 

This year, I spotted these in the grocery store, and my mind veered in another direction.


Campfires.  Musty tents, damp sleeping bags, ants in your pants, and mosquito bites.

Roasted marshmallows and melting chocolate. 

So, for dessert the other night, we made S'mores.  With marshmallows the size of lemons.


Our campfire was the microwave. 

This is how it unfolded.  Or un-blobbed. 


Good grief.


At this point, this S'more looked more like a fried egg, so I drizzled chocolate syrup over it to remind us that it was dessert, not breakfast.

It was impossible to eat Jumbo S'more with fingers only, so we used forks.  


This served three people.  Sweet, stretchy goodness.   Clearly, we need bigger graham crackers.  Maybe a graham cracker pie crust.

I thought about making a batch of Rice Krispy treats with these jumbo puffs.  I'll probably need only 4 marshmallows.

It might take us a while to empty this bag.